Adobe Lightroom Classic and Lightroom Desktop now include a new AI-powered Blemish Removal tool. This time-saving tool finds pimples, acne, and other temporary spots on the faces in a portrait and removes them with a single click. Just as important, it treats freckles, moles, and birthmarks as a separate category, so you can clean up a breakout without erasing the features that make a face unique.
Click here to download the examples in this video and play along! (Subscribers Only)
In this tutorial, I explain how the two Blemish Removal sliders work, how to fine-tune the results for each person in a group photo, how to copy your settings across a series of headshots, and how to clean up any redness that the tool sometimes leaves behind.
The Latest In A Series Of AI Time-Savers
Blemish Removal is the latest example of a trend that we have seen from Adobe in recent years: AI-powered tools that take over the slow, repetitive parts of photo editing. Last year, Adobe added AI Dust Spot Removal to Lightroom. Blemish Removal applies the same idea to portraits. Work that once took hours with the Heal tool in Lightroom, or with frequency separation in Adobe Photoshop, can now be done in a few minutes.
Where To Find Blemish Removal
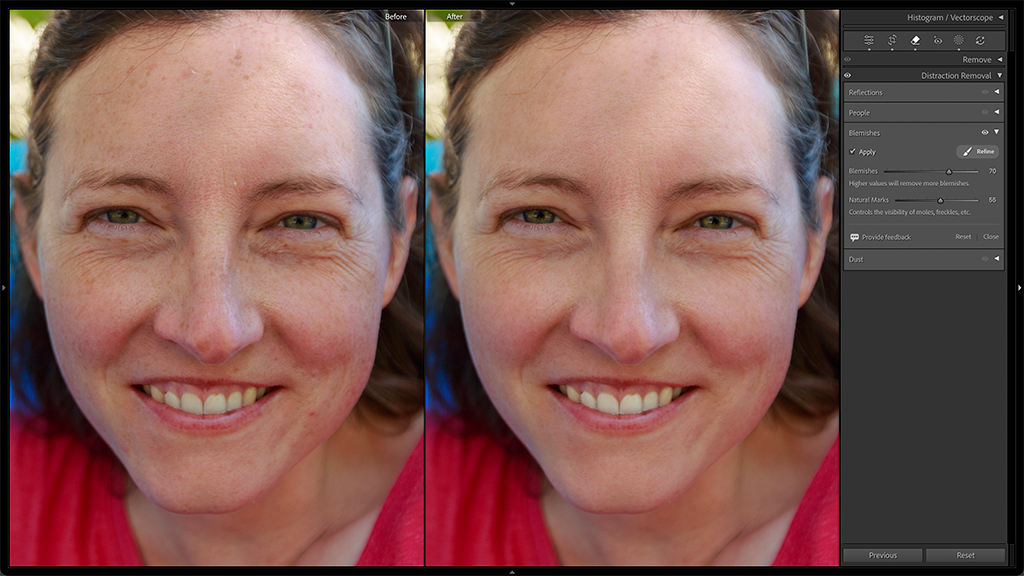
In the Develop Module, open the Remove Panel, expand the Distraction Removal section, and then open the Blemishes section. Check the Apply box, and Lightroom will analyze every face in the photo and remove the blemishes that it detects.
Blemishes And Natural Marks
Lightroom sorts the marks that it finds into two categories, and each category has its own slider:
- Blemishes are temporary spots, such as acne and pimples, that will go away on their own over time.
- Natural Marks are long-lasting features, such as moles, freckles, and birthmarks.
Understanding how these two sliders behave is the key to getting the most out of this tool.
The Blemishes Slider
The Blemishes slider defaults to 100, which removes every blemish that Lightroom detects. As you lower the slider, the smaller and less visible temporary skin spots reappear first, while the most prominent pimples stay hidden. That makes the Blemishes slider a control over which spots are removed, rather than a simple strength setting.
For many portraits, a value somewhere below 100 is the better choice. Lower values hide the most distracting imperfections while leaving enough natural texture in the skin to keep your subjects from looking artificial. For a glamour-style “perfect skin” look, leave the slider at 100.
The Natural Marks Slider
The Natural Marks slider works differently. Rather than choosing which marks to keep, it fades every detected natural mark by the same amount. Higher values make freckles and moles less visible, and at 100, they disappear completely. At 0, they are fully restored.
One important detail is easy to miss. The Natural Marks slider defaults to 50, which means that Lightroom fades your subject’s freckles, moles, and birthmarks halfway as soon as you check the Apply box. For many portraits, that gentle softening is welcome, but if you want those features to stay fully visible, drag the Natural Marks slider down to 0.
Working With More Than One Face
When a photo contains more than one person, Lightroom detects each face separately. Every face starts with the same default settings, but a Person icon appears for each face that Lightroom finds. Click an icon to adjust the Blemishes and Natural Marks sliders for that person alone.
This matters more than it might seem. The same settings rarely suit a child and a parent, or a teenager and a grandparent. In the video, I leave a young girl’s skin almost untouched while applying stronger correction to her mother’s skin, all within the same photo.
The Refine Brush
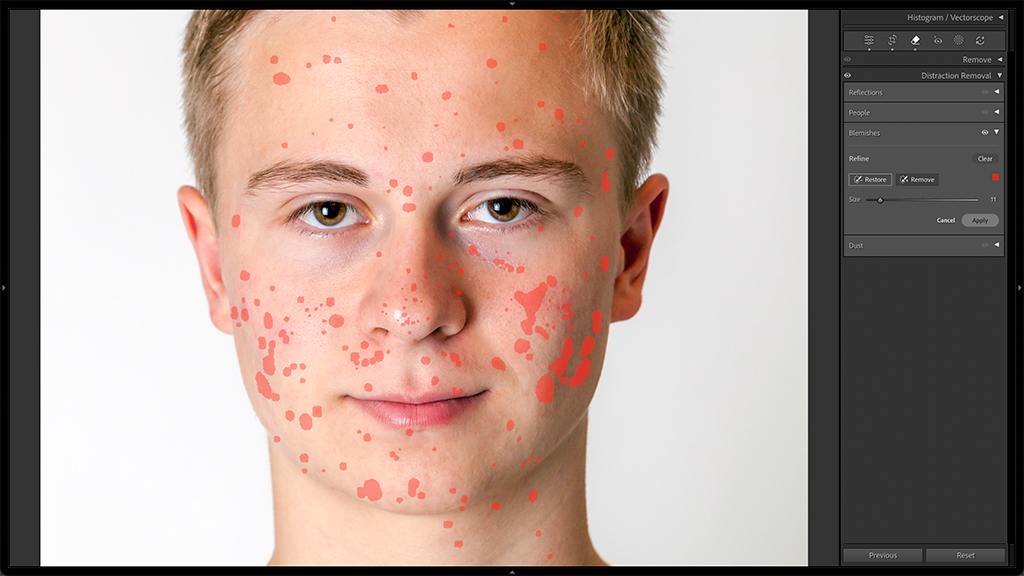
No automatic detection is perfect. Click the Refine button, and Lightroom places a red overlay on every spot that it has identified. The Refine Brush has two modes:
- Restore brings back a mark that the AI removed but that you want to keep, such as a beauty mark.
- Remove erases a spot that the AI missed.
Like the sliders, the Refine Brush works on one face at a time. When you are finished, click the Apply button at the bottom of the panel to commit your changes.
Copying Blemish Removal To Other Photos
When you are working on a series of similar headshots, you do not need to set up Blemish Removal on every frame. Adjust the first image, select the others in the Filmstrip, and click the Sync button. In the Synchronize Settings dialog, click Check None and then check only the Remove Blemishes option.
Lightroom does not simply paste the repairs from the first image onto the second. Because every frame is different, it runs its detection again on each photo and then applies the same slider values. For that reason, it is worth checking each synced photo for spots that need individual attention. There are other ways to copy settings, including from Classic’s Library Module and in Lightroom Desktop, and the steps are slightly different in each, but the result is the same.
Cleaning Up Leftover Redness
Blemish Removal does a good job of hiding the blemish itself, but it does not always remove the red discoloration around it. Those red patches can be more distracting on otherwise clean skin than the original spot was.
One effective fix uses Lightroom’s Masking tools:
- Create a Brush Mask with a soft, well-feathered brush, and paint over the red area.
- Open the mask’s Point Color section and use its eyedropper to sample a nearby area of healthy skin. Sample the skin tone that you want to create, not the red color that you are trying to remove.
- Lower the Variance slider. This pulls the colors within the masked area toward the color that you sampled.
- If needed, nudge the Hue, Saturation, or Luminance sliders by very small amounts for a closer match.
Repeat this process with a new mask for each area of redness.
A Fast, Flexible Starting Point
In my opinion, AI-powered Blemish Removal is one of the best features that Adobe has added to Lightroom in years. It is simple enough for anyone to use, yet it offers face-by-face and flaw-by-flaw precision. It will not replace careful retouching on every portrait, but as a starting point, it handles one of the most time-consuming parts of portrait photography in seconds.