![]() The Crop Tool in Lightroom Classic is packed with secrets that most photographers never discover. This guide explores the tool’s hidden capabilities, including undocumented keyboard shortcuts and expert techniques to refine your post-processing workflow.
The Crop Tool in Lightroom Classic is packed with secrets that most photographers never discover. This guide explores the tool’s hidden capabilities, including undocumented keyboard shortcuts and expert techniques to refine your post-processing workflow.
Click here to download the examples in this video and play along! (Subscribers Only)
![]()
1. Instant Crop Tool Activation
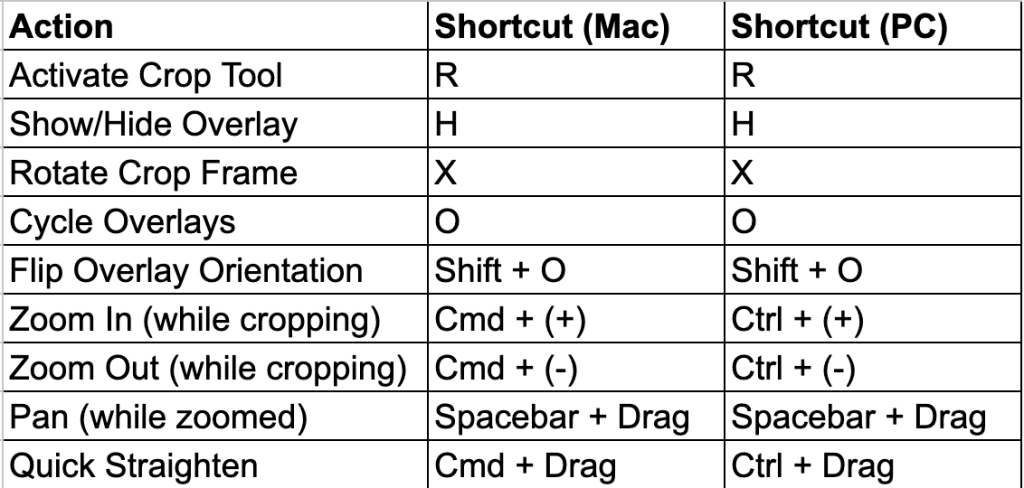
Press the R key on your keyboard to immediately enter the Develop Module and activate the Crop Tool! This simple keyboard shortcut can save you hours of wasted time.
2. The Crop Overlay Visibility Toggle
If your grid lines vanish, don’t panic. Press the H key to toggle the visibility of the Crop Guide Overlay on and off.
3. Understanding Aspect Ratio Lock
In the top right corner of the Crop Tool panel, you will see a small padlock icon. This controls whether your crop is “freehand” or is constrained to a specific aspect ratio.
- Unlocked Padlock: Allows you to drag the crop handles into any rectangular shape. This is useful for removing distractions or creating unique compositions, but it can be problematic if your finished image needs to match a specific output size.
- Locked Padlock: Forces the crop to maintain a specific ratio (e.g., 1:1, 2:3, 4:5).
The “Output Target” Problem
A common mistake for beginners is using a freehand crop when they intend to print the image. If you need to fill an 8×10 inch piece of paper then your image must use a 4:5 ratio.
Most modern cameras capture at a 3:2 ratio. Because 2 times 2 = 4 and 3 times 2 = 6, this means your photos will print perfectly at 4”x 6”, 8” x 12”, or 20 x 30 inches. However, trying to fit that same image into a 4” x 5” or 8”x 10” frame requires significant cropping. Use the Aspect Ratio Overlay (found under Tools > Crop Guide Overlay) to see exactly what you’ll be slicing off.
Cropping sets the shape (ratio) but not the final size of your image in Lightroom Classic. You must still use the Export Dialog or the Print Module to specify the final dimensions of your output image in inches or pixels.
4. Rotating the Cropping Frame
Adobe Lightroom Classic’s user interface lacks a dedicated button to flip a crop from landscape (horizontal) to portrait (vertical).
The Shortcut: Press the X key but be careful! The X key only rotates the frame if the Crop Tool is active. If the tool is closed, pressing X will Reject your photo and potentially mark it for deletion!
You can also rotate the frame by dragging a corner handle inward until the orientation “pops” to the opposite direction.
5. Precision Cropping: Zoom and Pan
For tasks like trimming frayed edges on scanned photos, you need extreme precision.
- Zooming In: Hold Cmd (Mac) or Ctrl (PC) and press the plus (+) key.
- Zooming Out: Hold Cmd (Mac) or Ctrl (PC) and press the minus (-) key.
- Panning: To move around the image while zoomed in, hold the Spacebar and click-drag with your mouse.
Note: The ability to zoom while the Crop Tool is active was introduced in Lightroom Classic version 15. Older versions of Classic need to be updated to take full advantage of this precision cropping feature.
6. Compositional Overlays
The Crop Tool can suggest better compositions through various overlays like the Rule of Thirds or the Golden Spiral.
- Cycle Overlays: Press the O key to cycle through the available guides.
- Rotate Overlay: If you are using a guide like the Golden Spiral, press Shift + O to flip the orientation of the guide itself to match your subject.
- Customizing Your Overlay Choices: Go to Tools > Crop Guide Overlay > Choose Overlays To Cycle to hide guides you don’t use, making your workflow faster.
7. Straightening Horizons
There is a faster way to fix a simple tilted horizon using the crop and rotate feature.
The Pro Trick: Hold Cmd (Mac) or Ctrl (PC) while your cursor is positioned inside of the crop frame. While this modifier key is depressed, your cursor will turn into the Level Tool.
Click and drag a line that traces the horizon in your image. When you release the mouse, Lightroom automatically rotates the image so your traced line is perfectly level. Once you let go of the modifier key, the Level Tool will ‘park’ itself making this the fastest way to fix a simple slanted horizon. For more complex geometric repairs, turn to Lightroom’s sophisticated Transform Panel.
Keyboard Shortcut Reference
By mastering these hidden shortcuts, you can significantly speed up your editing workflow in Adobe Lightroom Classic!