![]() Adobe Lightroom Classic now includes a Detect Duplicates tool that helps you streamline your Catalog, but beware. Relying blindly on this new feature carries major risks; if you are not careful, you could easily delete important photos or wreck saved projects. This tutorial, we will explain how the new Duplicate Detection feature really works and walk you through the steps that you should follow to avoid all the potential pitfalls.
Adobe Lightroom Classic now includes a Detect Duplicates tool that helps you streamline your Catalog, but beware. Relying blindly on this new feature carries major risks; if you are not careful, you could easily delete important photos or wreck saved projects. This tutorial, we will explain how the new Duplicate Detection feature really works and walk you through the steps that you should follow to avoid all the potential pitfalls.
Click here to download the plugins used throughout this video! (Subscribers Only)
![]()
Pre-Clean Checklist: Back Everything Up
Make sure that you have everything backed up before you delete or remove any duplicates. Make sure you know what you are doing with this tool, since there is no simple way to restore your images once they are deleted or removed from your Catalog. Before proceeding, make sure that you have a robust, up-to-date backup of all your images and your Lightroom Catalog.
Warning: The automatic backup prompt you see when closing Lightroom Classic backs up your catalog database (the .lrcat file) only. This internal backup contains your organizational structure but it does not protect any of your actual raw, dng, or jpeg photo files.
How the Duplicate Detection Actually Works
When you activate the new Detect Duplicates mode, Classic parses your images looking for files with matching “digital fingerprints.” To get the most complete results, set All Photographs as the source when you are running this search so that Lightroom can analyze every image throughout your entire Catalog. Because this process involves a pixel-by-pixel level analysis, the initial indexing can take anywhere from a few minutes to several hours, depending on the size of your image library.
As far as this tool is concerned, photographs are only considered to be duplicates if they meet the following criteria:
- Identical File Formats: This feature only matches like-with-like (for example, .dng to .dng or .jpg to .jpg). This tool will not pair a raw file with a visually identical jpeg copy since each file format has a different fingerprint.
- Uncropped Dimensions: The pixel dimensions of the uncropped files must match. A high-resolution original and a low-resolution copy of the exact same photograph will not be grouped together because their digital fingerprints differ.
- Non-Destructive Edits Are Grouped: Because Lightroom is a non-destructive editor, applying adjustments (such as converting a raw file to black and white), does not alter the underlying pixel data. Since these edits have not permanently altered the underlying image, a color raw file and a black-and-white copy of that same raw image still share the same digital fingerprint, meaning they will be stacked together as duplicates.
The Real Risks of Duplicate Removal
Once Lightroom Classic groups your duplicates into Stacks, it automatically designates one image as the “Original” and the others as duplicates. The “Original” image is positioned at the top-left position for each stacked group.

To determine which copy deserves “Original” status, Classic looks at its internal database records and chooses the file with the earliest “added to catalog” timestamp. Relying on this import-time driven logic to determine which image should be kept and which copies can be purged, without manual inspection, carries significant risk.
Risk #1: Losing Your Edited Copy (The Chronological Trap)
If you imported an image years ago, left it unedited, and then created a duplicate of that image to perform extensive retouching, Lightroom Classic will designate the older, unedited copy, as the “Original” because it was added to the catalog first. The Duplicate Detection feature does not automatically prioritize preserving your retouched copies, nor does it assign additional importance to any other type of post-import activities or adjustments.
If you run the automated duplicate removal command without verification then the photo which contains your edits could be permanently deleted, leaving you with only the unedited original!
Remedy: The “Set as Original” Command
Before removing any duplicates, expand the stack to carefully inspect your thumbnails:
- Open the Grid View Options window to ensure that your Colored Labels, Star Ratings, and Thumbnail Badges are visible.
- Identify the version within the duplicate stack that contains your best Develop module work.
- Right-click on the best edited copy and use the Set as Original command.
The Set as Original command temporarily overrides the chronological default moving the selected file up to the top position within that stack so it is preserved when you envoke the Remove Duplicates command.
Risk #2: Losing Valuable Metadata
Duplicates imported at different times often contain different metadata. One copy might have a Star Rating, Keywords, GPS location data, or a Caption, while the automatically designated “Original” lacks some or all of this descriptive information. Deleting the duplicate(s) without taking corrective action risks discarding all of that valuable information.
Remedy: Metadata Synchronization
If you have a stack of duplicate images where different copies contain valuable metadata, you should copy and sync everything that matters (such as Keywords or Captions) to the “Original” before deleting any of the duplicates:
- Select a duplicate that contains useful metadata.
- Hold down the Command key on a Mac or the Control key on a Windows PC, and click the designated “Original” image at the top of the stack so both are selected.
- Ensure the duplicate, the copy with the important metadata, is the “Most Selected” image. Most Selected status is indicated by a brighter white border around the thumbnail when compared to all of the other selected images.
- Click the Sync Metadata button at the bottom of the right panel in the Library Module.
- Click Check All or select the specific metadata fields you want to preserve and then click the Synchronize button.
Risk #3: Losing Collection Memberships
Even when two duplicate images contain identical Develop Module edits and matching metadata, their organizational roles in your catalog can be entirely different. If you delete a duplicate that belongs to a critical Collection, a Saved Slideshow, a Saved Print Layout, or a Saved Book Project then that Collection membership status is permanently lost.
Collections are not a type of metadata so the Sync Metadata command is of no use here and unfortunately, no warning messages will appear in this potentially disastrous scenario.
Remedy: Add The Original Into All Important Collections
One solution is to click on the Collections badge for each duplicate within the stack. Clicking on these thumbnail badges triggers a pop-up that shows Collection membership information for that image. Once you have identified all of the necessary collections, temporarily leave Duplicate Detection mode, and manually add your “Original” image into all of the meaningful Collections before resuming your duplicate removal workflow.
This can be a tedious process if you have dozens of duplicates with lots of Collections memberships.
Better Solution: Use The Unify Collection Membership Plugin
You can bypass this tedious drag-and-drop workflow using this plugin. Use my Unify Collection Membership Across Selected Photos Plugin to transfer all Collection membership information from the duplicates to the “Original” file.
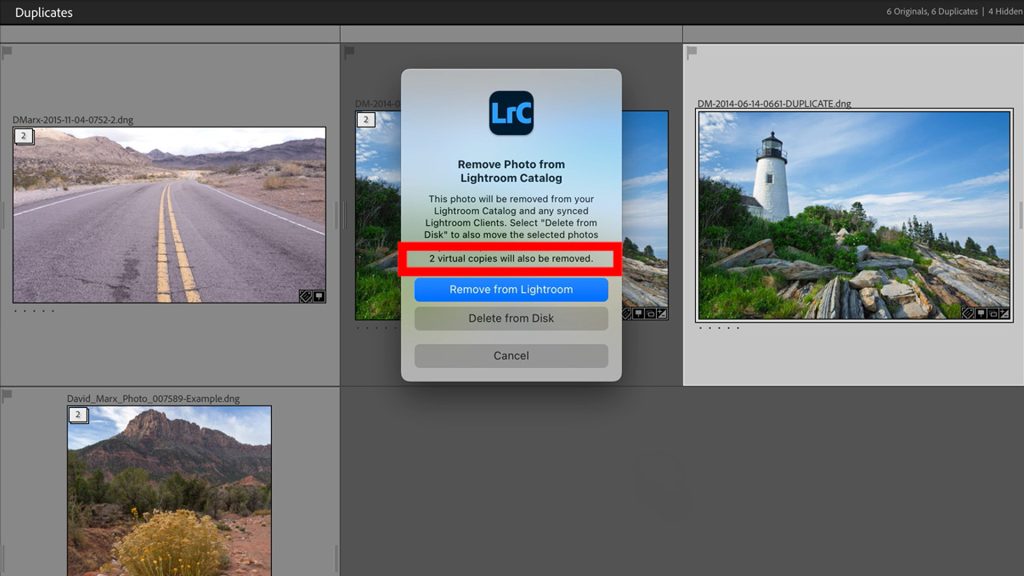
Risk #4: Destroying Virtual Copies
Lightroom Classic’s duplicate detection tool intentionally ignores Virtual Copies. If you remove or delete any image with attached Virtual Copies then those Virtual Copies will be permanently discarded. This poses a major risk if you have used Virtual Copies when designing a saved Book project, Web gallery, or a saved Print layout. If you accidentally keep the “Original” file, which contains no virtual copies, and discard the duplicate that does then all of your work on these saved projects may be ruined.
Better Solution: Use The Mark Masters That Have Virtual Copies Plugin
To avoid inspecting every stack manually, subscribers can utilize this my Mark Masters That Have Virtual Copies Plugin. When active, this plugin will identify and mark any files that have attached Virtual Copies with a Pick Flag and a Purple Colored Label. Once you can see which duplicates are at risk then you can instruct Classic to ignore all of these images using the Hide From Duplicates command.
“Remove” vs. “Delete from Disk”
When you are finally ready to purge all of the duplicates within a stack, use the Remove Duplicates command. At this point, Classic will present its standard Remove versus Delete dialog box containing two options. Only select Delete from Disk once you have verified that the “Original” contains your best edits, most useful metadata, all critical Collection Memberships, and you are sure that you will not upset any Virtual Copy linkages.
| Action | What It Does | The Consequence |
|---|---|---|
| Remove | Deletes the image from the Lightroom catalog but leaves the physical file on your hard drive. | This creates “orphaned” photographs. The physical files continue to occupy hard drive space but since they are no longer indexed by this Lightroom Catalog, you can no longer manage them from within this application. |
| Delete from Disk | Deletes the photo from this Catalog and moves the physical file into your computer’s system trash. | This is the only option that actually frees up precious hard drive storage howeveronce the trash has been emptied, the deleted files are no longer recoverable. |
An Ounce Of Prevention
The most efficient way to handle duplicate files is to prevent this problem from occurring in the first place. Duplicate images in Lightroom Classic are usually the byproduct of a poorly structured Import routine.
The best way to avoid this problem is to use a good Import Preset with every memory card every time. If you bring logic and consistency to your Import workflow then Duplicate Detection is rarely necessary within your Classic Catalog!