DNG, the file extension for the Adobe Digital Negative file format, is meant to be a universal raw file format. The idea of creating a file format that can hold the original sensor data from any type of digital camera is simple enough, but the use of this file format remains a hot topic of debate among photographers.
In the video tutorial below, I will teach you three ways to convert your proprietary, meaning camera-branded, raw files into the DNG file format using Adobe Lightroom Classic.
A note about this video: this tutorial was recorded when the program was still called Adobe Photoshop Lightroom Classic, so you will hear the older name throughout this video. The three conversion methods shown in this lesson still work the same way today. Where a specific setting has changed, I have noted the current version below.
Although I demonstrate all three options for DNG conversion, I take no stance on whether you should, or should not, choose to use the DNG raw file format. DNG conversion is not for everyone. It has both benefits and drawbacks, and you may well decide that this option does not suit your needs at this time. That is okay!
Who This Tutorial Is For
DNG is a publicly documented raw file format. If you shoot JPEG images only, then DNG conversion does not apply to you.
If, on the other hand, you set your camera to record raw photos then your camera will save its new images using a file format that carries the camera maker’s proprietary file extension. Canon cameras use the .CR3 format. Nikon cameras use .NEF, and Sony cameras use .ARW. Throughout this lesson, the term “proprietary raw file” refers to these, or any other, camera-branded file format.
Method 1: Convert To DNG On Import
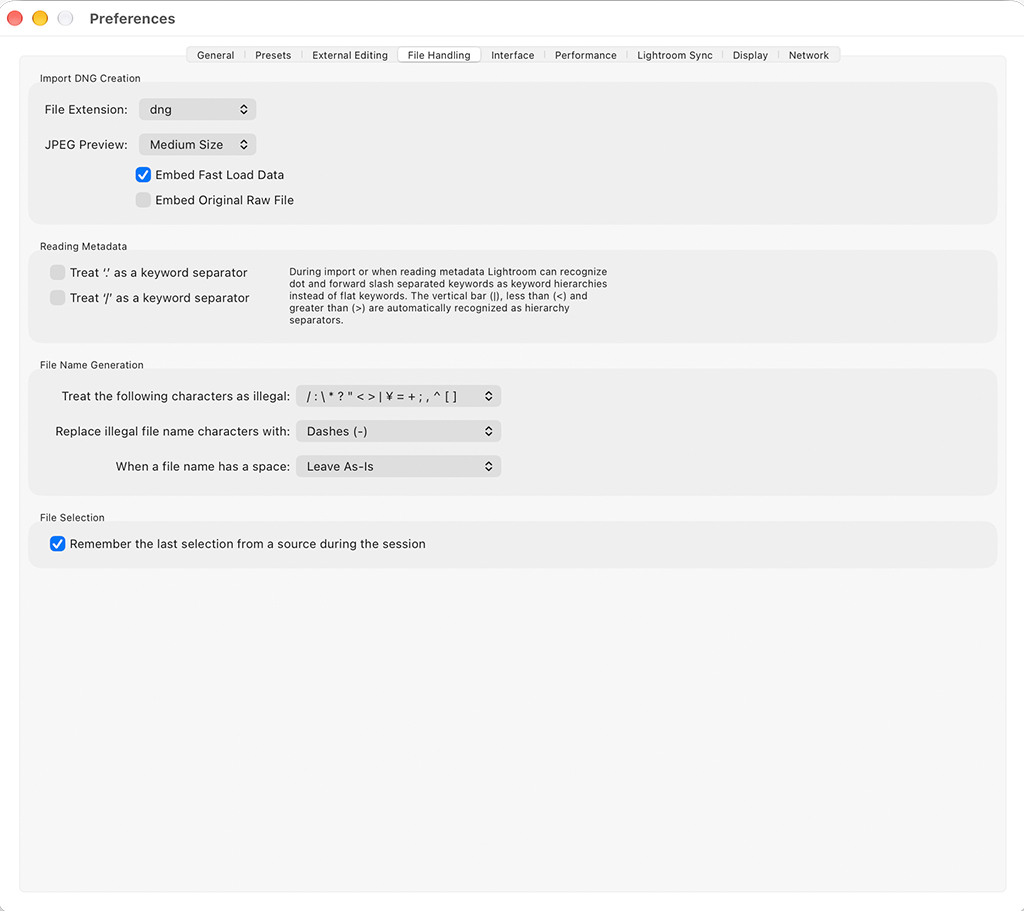
The first option is to convert your proprietary raw files as they come off your memory card. Before you convert on Import for the first time, it is worth checking the Import DNG Creation settings inside the Preferences menu. On a Mac, go to Lightroom Classic > Preferences. On Windows, go to Edit > Preferences. Then click on the File Handling tab.
- File Extension: This choice only changes whether the extension is written in upper or lower case. This distinction makes no difference, so you can leave this option alone.
- JPEG Preview: Medium Size is a sensible choice for most photographers.
- Embed Fast Load Data: I recommend enabling this option since it slightly improves Lightroom’s performance.
- Embed Original Raw File: This option places a complete copy of your proprietary raw file inside the DNG so that it can be extracted later if needed. In practice, this means that every DNG file that Lightroom creates for you will contain two complete copies of the same image within the same container, which greatly increases file size. Leave this option off unless you are certain that enabling this choice will improve your workflow.
Once your settings are correct, open Classic’s Import Dialog and choose Copy as DNG instead of Copy from the top Options Bar.
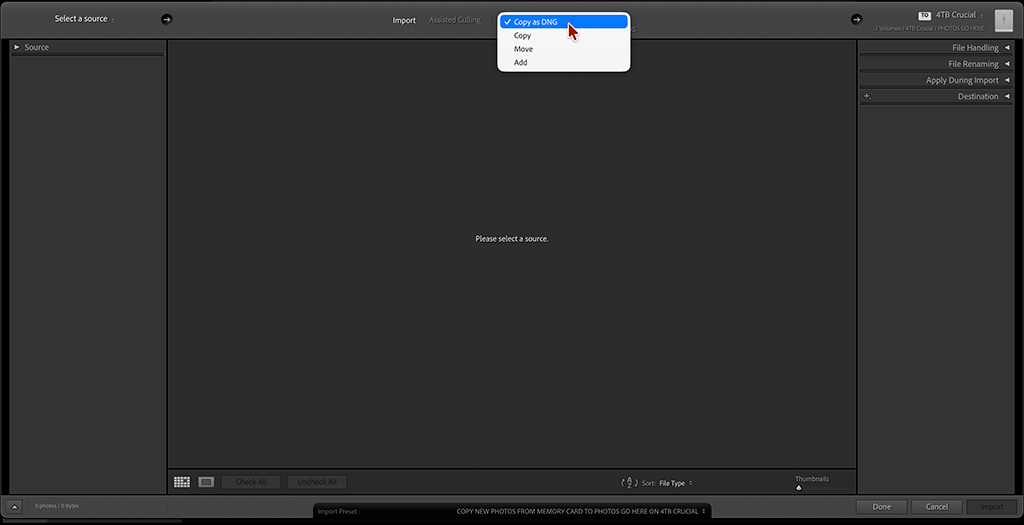
If you enable the Copy as DNG feature, then Lightroom Classic will copy new images to your hard drive in their original format, and then it will convert each file to DNG. If DNG conversion is part of your standard Import workflow, then you can automate this repetitive process with an Import Preset.
Method 2: Convert Existing Photos In The Library Module
If you did not convert your proprietary raw files to DNG during the Import process, don’t panic. You can convert a proprietary raw file to DNG at any time in Classic’s Library Module.
To convert proprietary raw files that are already in your Catalog, select the photos that you want to convert in the Grid View, then use the Library > Convert Photo to DNG command.
Tip: work from Grid View when converting more than one photo at a time. If several photos are selected while you are in any of the other View modes, then Lightroom Classic converts only the active (most-selected) photo.
When the Convert Photo to DNG Dialog appears, pay attention to these settings:
- Only convert Raw files: acts as a safety switch. It prevents Lightroom Classic from converting any of your JPEG, TIFF, or other non-raw files.
- Delete originals after successful conversion: moves your proprietary raw files to the trash once your new DNG files have been created. If you leave this option off, then you will end up with both files (the original proprietary raw file and a DNG copy) on your hard drive and in your Catalog. Make sure that your original raw files are backed up before you enable this option.
- Compatibility: Choose the option with the highest Camera Raw version number in the menu. When this video was recorded, that number was 11.2, but Adobe is now up to Camera Raw version 16.0 and later. Choosing a lower number will limit the advanced features that your DNG photographs can use.
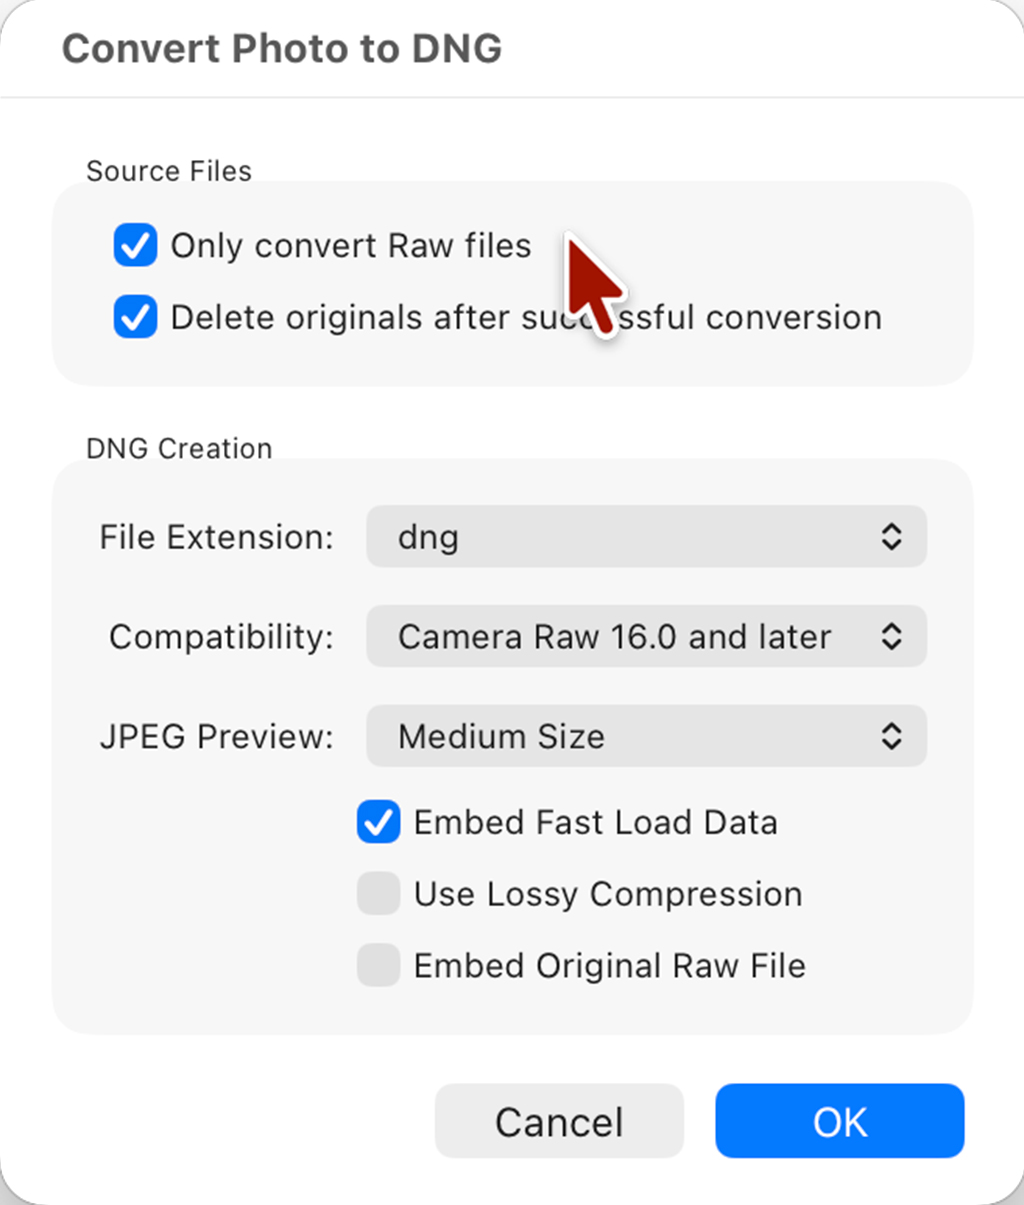
For the other settings in the DNG Creation section, use the same choices that I recommended for the Preferences menu above, but leave the Use Lossy Compression option turned off. I will explain why at the end of this lesson.
How To Find Every Proprietary Raw File In Your Catalog
If you decide that you want to convert a large number of files at once, there is a quick way to separate your proprietary raw files from everything else in your Catalog.
- In the Library Module’s left sidebar, open the Catalog Panel and click on All Photographs.
- In the Library Filter Bar at the top of Grid View, activate the Metadata Filter.
- Click the header of the first column (it usually says Date) and choose File Type from the menu that appears.
- Choose Raw. Now the Grid View will only display your proprietary raw files. The label says “Raw,” but it counts only camera-branded raw files, not DNG images.
- Go to Edit > Select All, then Library > Convert Photo to DNG.
Be aware that converting thousands of files at once can take hours. Only start a large conversion batch when you are prepared to let your computer work uninterrupted for an extended period of time.
Method 3: Export A DNG Copy
The third option, and the one that most photographers will use least often, is in the Export Dialog. In Lightroom Classic, exporting always means creating a new copy of an image for a specific purpose.
If you would like to create a DNG copy for use outside of Lightroom, then set the Image Format to DNG in the File Settings section. This method leaves the original file in your Catalog untouched. The exported DNG is a separate file that is intended for use outside of your Catalog.
This Convert on Export option is useful when you want to keep your proprietary raw files in Lightroom Classic but need a DNG copy for use elsewhere. This is often the best way to share a copy of your proprietary raw file with another photographer or photo editor.
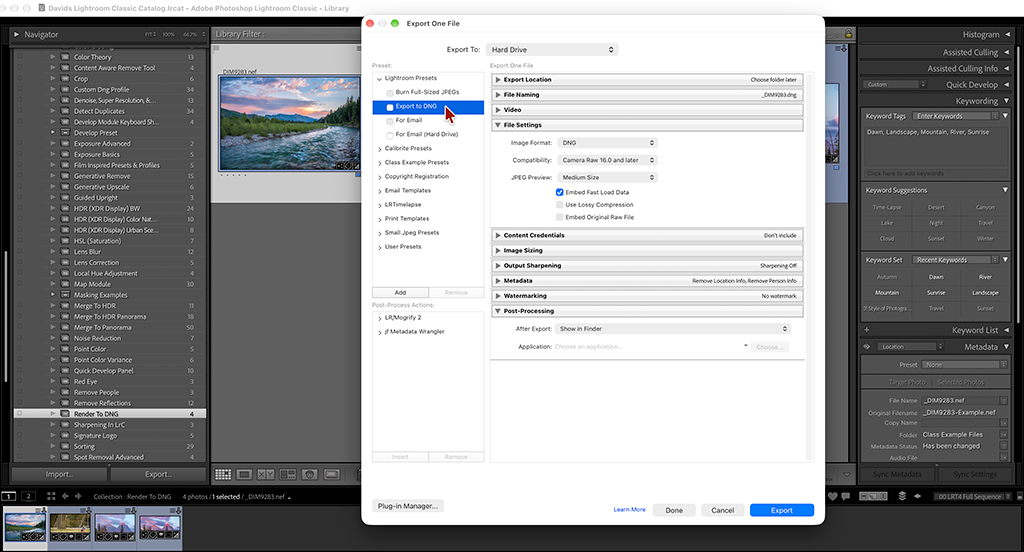
When you export a DNG copy with the Use Lossy Compression option turned off, the new file retains all of your original raw image data. Your Lightroom Develop settings travel with it as instructions that Adobe software can read, but your Operating System will ignore them. The metadata that is included depends on your choices in the Metadata section of the Export Dialog.
A Warning About Lossy Compression
The Use Lossy Compression option creates a DNG file that is smaller than your proprietary original by permanently discarding sensor data and converting the raw mosaic into a demosaiced linear DNG. This option saves disk space, but the image that it creates is less flexible than your original capture. For most photographers, this kind of data loss is something to avoid.
Convert To DNG Is Not The Same As Render To DNG
Newer versions of Lightroom Classic include a separate command called Render To DNG. Do not let this similar-sounding command confuse you. The Render To DNG command creates a new file with all of your current edits permanently applied. The files that the Render To DNG command creates are not raw. These images are like flattened TIFF files inside a DNG wrapper.
Render To DNG is not a way to convert a proprietary raw file into a raw DNG, and it is not covered in this lesson. The three methods above preserve your raw data and keep your edits non-destructive.
There Is No Ticking Clock
The central message in this lesson is that there is no time limit on this decision. There are some very good reasons why you might not want to convert to DNG right now or ever.
There are also some very good reasons why the DNG file format might make your life easier. Since Lightroom Classic allows for DNG conversion at any time, I urge you to do some research and think carefully about this topic. Follow the links below to learn from experts on both sides of the debate, and then return to the steps in this video whenever you are ready.
DNG Conversion Information:
- Should I Convert To DNG? from Victoria Bampton
- DNG Pros, Cons, and Myths from Martin Evening
- Why I Don’t Convert to DNG from Matt Kloskowski