![]() The AI Dust Spot Removal feature in Adobe Lightroom Classic is a revolutionary leap forward. Say goodbye to tedious retouching! This comprehensive guide will teach you how to leverage Lightroom’s new dust removal AI, how to manually correct missed spots, and the advanced search technique needed to ensure a truly spotless photograph.
The AI Dust Spot Removal feature in Adobe Lightroom Classic is a revolutionary leap forward. Say goodbye to tedious retouching! This comprehensive guide will teach you how to leverage Lightroom’s new dust removal AI, how to manually correct missed spots, and the advanced search technique needed to ensure a truly spotless photograph.
Click here to download the examples in this video and play along! (Subscribers Only)
![]()
Automated Cleanup with AI Dust Spot Removal
Manually removing each imperfection is incredibly time-consuming when you are starting with image that is covered in dust spots. Fortunately, Adobe’s new Artificial Intelligence powered Dust Removal feature can zap the majority of these spots in seconds!
Step-by-Step AI Dust Removal:
- Open your image in the Develop module.
- Click on the Remove Tools icon.
- Open the Distraction Removal area, expand the new DUST section, and enable the new AI Dust Removal option.
Lightroom’s machine learning will immediately analyze the image and apply patches over all of the dust spots that it identifies!
Critical: Order of AI Operations
When using multiple AI tools in Lightroom, order matters. If your photograph requires AI Denoise then you should apply that step first, as Denoise affects every pixel in the image.
If you apply AI Dust Removal before AI Denoise then you might create weird unnatural looking artifacts. If you make this mistake, or get other AI edits out of order, then the AI Edit Status warning symbol at the top right will turn yellow.
When this happens, Lightroom is asking for permission to update your work and reorder all your AI edits for you. While this isn’t an irreversible disaster, updating again and again slows down your editing workflow.
Rule of Thumb: Always run AI Denoise first then apply AI Dust Spot Removal.
Manual Refinement with the Healing Tool
While this AI is impressive, it is not flawless. It will miss spots that it should have found and occasionally remove things that it should have left alone. When this happens, it’s time to turn to the manual controls.
For precise spot removal, the Healing Tool (the middle option in the Remove Tool panel) is your best friend. The Healing tool is a sophisticated copy-and-paste function that attempts to match the texture and color of the sampled area with the area being replaced.
To use the Healing Tool, position your brush over a dust spot that the AI missed and click. Lightroom will automatically select a source patch for you. For standard dust removal, keep the Feather setting at 0 and the Opacity at 100%.
Advanced Healing Control
- Force a New Guess: If Lightroom chooses a poor source patch, you can force it to try again by tapping the forward slash (/) key on your keyboard.
- Manual Patch Selection: To completely override the computer, you can drag the source ring (the sampled area) to any desired location on your image to select a perfect patch yourself.
- Resizing a Patch: Place your cursor over the edge of an existing patch circle. When the cursor turns into a double-sided arrow, click and drag to resize the patch.
- Deleting a Patch: If you make a mistake, simply select the unwanted patch and press the Delete key on your keyboard. This shortcut works for both manually created and AI-generated spots.
Mastering the Professional Dust Search
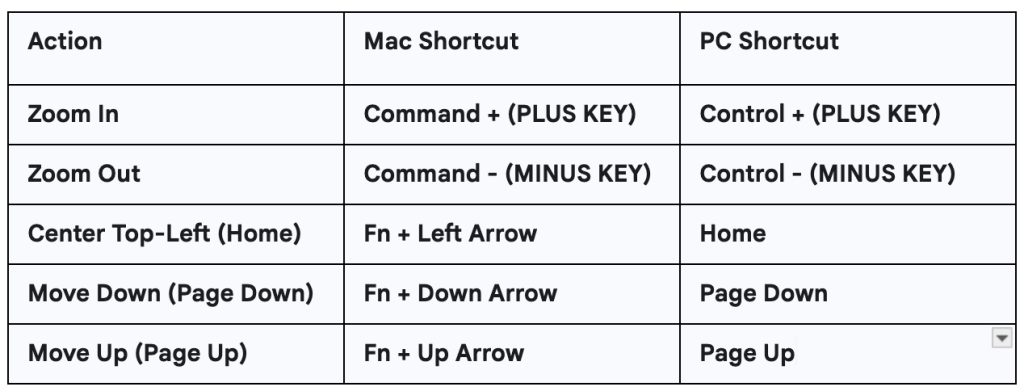
You need to search methodically across the entire image at 100% magnification, or more, to ensure your photograph is truly ready for high-quality printing. Use the Page Up and Page Down commands instead of the Hand tool (Spacebar) to pan around your image.
Paging allows you to move methodically through the image in discrete blocks. Lightroom is smart: when you Page Down past the end of a column, it automatically moves you up and over to the top of the next row, creating a seamless, top-to-bottom inspection path.
Zooming and Panning Shortcuts
The Visualize Spots Overlay
This is the secret weapon for finding tricky imperfections. Whenever the Remove or Healing Tools are active, press the letter A on your keyboard to toggle the Visualize Spots overlay. This feature applies a high-contrast overlay to your image, making dust spots, sensor dirt, and other minor flaws highly visible.
You can adjust the Visualize Spot slider to increase or decrease the contrast of the overlay, helping you fine-tune the detection process.
Use AI Dust Removal, plus the Page Down shortcut, while repeatedly toggling the Visualize Spots overlay (A key) on and off to meticulously clean your entire image. This combination is the most reliable way to guarantee your polished photograph is completely dust spot free!