This website or its third-party tools use cookies which are necessary to its functioning and required to improve your experience. By clicking the consent button, you agree to allow the site to use, collect and/or store cookies.
This site requires cookies to work. Please click the consent button to view this website.
I accept
Deny cookies Go Back

Focus Photo School

  • Member Login
  • Course Library
    • ADOBE LIGHTROOM CLASSIC TUTORIALS
    • ADOBE LIGHTROOM FOR MOBILE APP TUTORIALS
    • ADOBE LIGHTROOM (CLOUD-BASED) TUTORIALS
    • ADOBE PHOTOSHOP TUTORIALS
    • PHOTOGRAPHY TUTORIALS
    • SNAPSEED FROM GOOGLE APP TUTORIALS
  • Join Now

How To Use Color Variance In Lightroom Classic

    Divider LineVariance, a powerful color contrast control, is now integrated into Adobe Lightroom and Lightroom Classic’s Point Color panel. Variance adjusts the difference between a selected hue and its neighboring colors on the color wheel. This fantastic new feature can be used as a global adjustment or within the Masks panel for additional precision.

Click here to download the examples in this video and play along! (Subscribers Only)

Divider Line

Important Note: To harness Variance effectively, you need a solid foundation in Lightroom’s Point Color and Masking tools.

How the Variance Slider Works

The Variance slider alters the relationship between the color that you choose and all of the other colors in your image.

  1. Negative Variance (Color Harmony): Dragging the slider toward a negative value reduces the difference between the sampled hue and its neighbors. This reduces color contrast.
  2. Positive Variance (Color Contrast): Dragging the slider toward a positive value increases color contrast. Neighboring hues are pushed further away from the sampled color, resulting in more energetic images.

Enhanced Color Landscapes

Variance is a wonderful addition for landscape photographers. Boosting color contrast can make fall foliage or wildflower photos pop. Conversely, reducing color contrast creates a quieter, more harmonious appearance. To apply this selectively, combine Variance with Lightroom’s AI-powered Landscape Masks to target these changes to dominant subject in your scene.

Remember when using Variance that you must sample the color that you wish to keep (or unify towards), not the color(s) that you want to eliminate.

Smoother Skin Tones

For portrait photographers, combining Lightroom’s AI Portrait Retouching Masks and a negative Variance setting is an incredibly fast way to smooth out uneven skin tones. You can neutralize excessive redness in your subject’s face in no time using the Variance command plus Point Colors other Hue and Saturation controls.
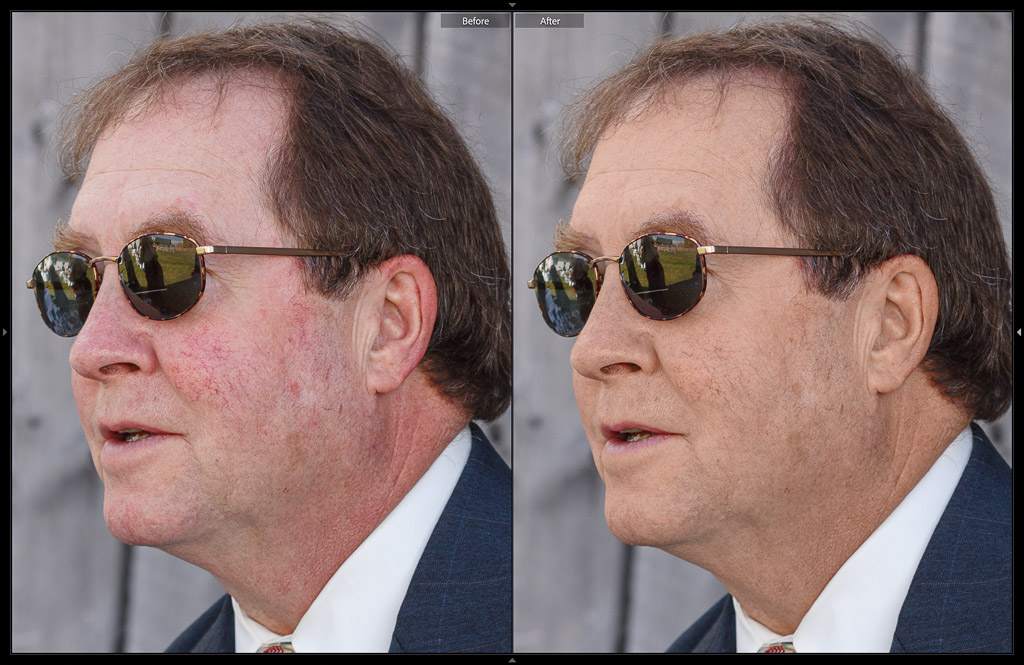
Smooth Skin Tones Using Point Color Variance In Adobe Lightroom

The Point Color Variance tool immediately becomes an essential, high-impact asset for any Lightroom user. With this control, expanding or reducing color contrast requires nothing more than a simple eyedropper and a single slider movement!

Unlock Focusphotoschool Course Banner

View Previous
  • LIGHTROOM CLASSIC: BASIC IMAGE EDITING
    • Module 1:IMAGE EDITING BASICS
      • Lesson 1:Editing Without Fear In Adobe Lightroom Classic
      • Lesson 2:5 Useful Develop Module Keyboard Shortcuts In Adobe Lightroom Classic
    • Module 2:OPTICS
      • Lesson 1:How To Use The Lens Correction Panel In Adobe Lightroom Classic
      • Unlock This Lesson
        How To Use The Transform Panel In Adobe Lightroom Classic
    • Module 3:PROFILES
      • Lesson 1:Profiles In Adobe Lightroom Classic
      • Lesson 2:Unlocking Adaptive Profiles in Adobe Lightroom Classic: AI-Powered Precision
      • Unlock This Lesson
        How To Set New Raw Develop Defaults In Adobe Lightroom Classic
    • Module 4:EXPOSURE IMPROVEMENTS
      • Lesson 1:How To Set The Exposure In Adobe Lightroom Classic (Basic)
      • Lesson 2:How To Set The Exposure In Adobe Lightroom Classic (Advanced)
      • Unlock This Lesson
        How To Use Auto Exposure In Adobe Photoshop Lightroom Classic
      • Unlock This Lesson
        Adding A Vignette In Adobe Photoshop Lightroom Classic
      • Unlock This Lesson
        Adding Contrast With The Tone Curve In Adobe Photoshop Lightroom Classic
    • Module 5:COLOR ADJUSTMENTS
      • Lesson 1:White Balance Corrections In Adobe Photoshop Lightroom
      • Lesson 2:How To Use Saturation & Vibrance In Adobe Photoshop Lightroom Classic
      • Unlock This Lesson
        How To Use The Target Adjustment Tool In Adobe Photoshop Lightroom Classic
      • Lesson 3:How To Use Point Color In Lightroom Classic
      • Lesson 4:How To Use Color Variance In Lightroom Classic
      • Unlock This Lesson
        Boost Your Colors With The Calibration Panel In Adobe Photoshop Lightroom Classic
      • Unlock This Lesson
        How To Use Color Grading In Adobe Photoshop Lightroom Classic
      • Unlock This Lesson
        The Amount Slider Hack You’ve Been Missing In Lightroom Classic
    • Module 6:BLACK & WHITE CONVERSION
      • Lesson 1:How To Make Black & White Photos Using Adobe Photoshop Lightroom Classic
      • Unlock This Lesson
        How To Add Grain With Masks In Adobe Photoshop Lightroom Classic
    • Module 7:DETAILS
      • Lesson 1:AI Denoise, Super Resolution & Raw Details Workflow Updates
      • Unlock This Lesson
        How To Use Lens Blur In Adobe Lightroom Classic
      • Unlock This Lesson
        Manual Noise Reduction With Adobe Photoshop Lightroom Classic
      • Unlock This Lesson
        How To Sharpen In Adobe Photoshop Lightroom Classic
    • Module 8:IMAGE REPAIRS
      • Lesson 1:AI Dust Spot Removal In Lightroom Classic
      • Lesson 2:The Generative Remove Tool In Lightroom Classic
      • Unlock This Lesson
        How To Use The Content Aware Remove Tool In Lightroom Classic
      • Lesson 3:How To Remove Reflections Using AI In Adobe Lightroom Classic
      • Unlock This Lesson
        Red Eye Removal In Adobe Photoshop Lightroom Classic

Your Account

Your Member Profile & Billing Info

© 2025 Focus Photo School · Rainmaker Platform