This website or its third-party tools use cookies which are necessary to its functioning and required to improve your experience. By clicking the consent button, you agree to allow the site to use, collect and/or store cookies.
This site requires cookies to work. Please click the consent button to view this website.
I accept
Deny cookies Go Back

Focus Photo School

  • Member Login
  • Course Library
    • ADOBE LIGHTROOM CLASSIC TUTORIALS
    • ADOBE LIGHTROOM FOR MOBILE APP TUTORIALS
    • ADOBE LIGHTROOM (CLOUD-BASED) TUTORIALS
    • ADOBE PHOTOSHOP TUTORIALS
    • PHOTOGRAPHY TUTORIALS
    • SNAPSEED FROM GOOGLE APP TUTORIALS
  • Join Now

How To Make Black & White Photos Using Adobe Photoshop Lightroom Classic

    Divider LineAdobe Photoshop Lightroom Classic provides photographers with a powerful set of tools to make color images into black and white. In this video tutorial, you will learn how to create compelling black and white photographs using Lightroom’s Profile Browser and the Black and White Mix panel.

Click here to download the examples in this video and play along! (Subscribers Only)

Divider Line

Adobe Photoshop Lightroom Classic Profile Browser

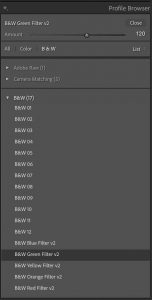
The Power of the Profile Browser

The Profile Browser is a hidden panel inside of Lightroom Classic’s Develop Module that contains a wide variety of black and white starting points. These profiles remap the colors of your original image into intriguing shades of gray.

Choosing a good profile for your initial color to black and white conversion is vital to the success of your finished product. No other part of the entire process is as important as this step and once you have chosen a profile that you like, you can amplify or reduce the profile’s strength using the Amount slider!

Refining with the Black and White Mix Panel

You can refine some of the tones in your image using the Black and White Mix panel after you have picked a good profile. The eight sliders in this panel make use of your image’s original color data and you can use them to refine the brightness for specific parts of your black and white image.
Adobe Photoshop Lightroom Classic Black And White Mix Panel
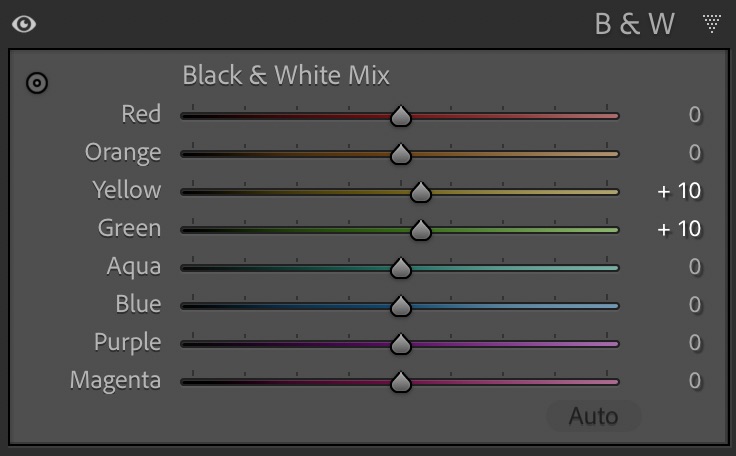
Moving the Blue slider, for example, towards a positive value tells Lightroom to remap all of the areas that were blue in your original image over to brighter shades of gray. Moving any of these sliders towards a negative value has the opposite effect.

You can either drag the Black and White Mix panel’s controls around yourself or you can activate the Target Adjustment Tool for additional assistance. Be gentle though when using these tools. Moving the Black and White Mix sliders too far can create weird artifacts or banding into your final image.

Fine-Tuning with the Exposure Controls and the Tone Curve Panel

At this point in your black and white image processing workflow, you should turn to the six exposure controls in the middle of Lightroom’s Basic panel and the Tone Curve panel. Use these controls to further refine the overall brightness and contrast throughout your entire image and to maximize your image’s tonal separation.

Extending your images tonal range from almost inky black all the way up to almost pure white will usually give your image maximum impact.

Adobe Photoshop Lightroom Classic Black & White Mask Panel

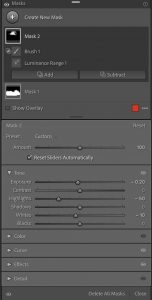
Targeted Enhancements with the Masking Tools

Finally, Lightroom’s Masking Tools can be used for carefully targeted adjustments to specific parts of your black and white image. You can use Lightroom’s amazing new AI-powered selection tools to target your subject or the sky.

You can also use tools like Luminance Range or the Brush Tool, and advanced mask building modes like Intersect, to increase the sharpness, brightness, or contrast of specific areas. Working with masks, you can push your viewer’s attention over to the areas that you want them to notice in your final image and pull their attention away from areas that you want them to ignore.

If you follow this complete step-by-step black and white image processing routine then you can unleash your creativity and elevate your black and white photography to new heights!

  • LIGHTROOM CLASSIC: BASIC IMAGE EDITING
    • Module 1:IMAGE EDITING BASICS
      • Lesson 1:Editing Without Fear In Adobe Lightroom Classic
      • Lesson 2:5 Useful Develop Module Keyboard Shortcuts In Adobe Lightroom Classic
    • Module 2:OPTICS
      • Lesson 1:How To Use The Lens Correction Panel In Adobe Lightroom Classic
      • Unlock This Lesson
        How To Use The Transform Panel In Adobe Lightroom Classic
    • Module 3:PROFILES
      • Lesson 1:Profiles In Adobe Lightroom Classic
      • Lesson 2:Unlocking Adaptive Profiles in Adobe Lightroom Classic: AI-Powered Precision
      • Unlock This Lesson
        How To Set New Raw Develop Defaults In Adobe Photoshop Lightroom Classic
    • Module 4:EXPOSURE IMPROVEMENTS
      • Lesson 1:How To Set The Exposure In Adobe Photoshop Lightroom Classic (Basic)
      • Lesson 2:How To Set The Exposure In Adobe Photoshop Lightroom Classic (Advanced)
      • Unlock This Lesson
        How To Use Auto Exposure In Adobe Photoshop Lightroom Classic
      • Unlock This Lesson
        Adding A Vignette In Adobe Photoshop Lightroom Classic
      • Unlock This Lesson
        Adding Contrast With The Tone Curve In Adobe Photoshop Lightroom Classic
    • Module 5:COLOR ADJUSTMENTS
      • Lesson 1:White Balance Corrections In Adobe Photoshop Lightroom
      • Lesson 2:How To Use Saturation & Vibrance In Adobe Photoshop Lightroom Classic
      • Unlock This Lesson
        How To Use The Target Adjustment Tool In Adobe Photoshop Lightroom Classic
      • Unlock This Lesson
        How To Use Point Color In Lightroom Classic
      • Unlock This Lesson
        Boost Your Colors With The Calibration Panel In Adobe Photoshop Lightroom Classic
      • Unlock This Lesson
        How To Use Color Grading In Adobe Photoshop Lightroom Classic
      • Unlock This Lesson
        The Amount Slider Hack You’ve Been Missing In Lightroom Classic
    • Module 6:BLACK & WHITE CONVERSION
      • Lesson 1:How To Make Black & White Photos Using Adobe Photoshop Lightroom Classic
      • Unlock This Lesson
        How To Add Grain With Masks In Adobe Photoshop Lightroom Classic
    • Module 7:DETAILS
      • Lesson 1:How To Use Lens Blur In Adobe Photoshop Lightroom Classic
      • Lesson 2:AI-Powered Noise Reduction In Adobe Photoshop Lightroom Classic
      • Unlock This Lesson
        Manual Noise Reduction With Adobe Photoshop Lightroom Classic
      • Unlock This Lesson
        How To Sharpen In Adobe Photoshop Lightroom Classic
    • Module 8:IMAGE REPAIRS
      • Lesson 1:The Generative Remove Tool In Lightroom Classic
      • Unlock This Lesson
        How To Use The Content Aware Remove Tool In Adobe Photoshop Lightroom Classic
      • Unlock This Lesson
        Spot Removal Basics In Adobe Photoshop Lightroom Classic
      • Unlock This Lesson
        Advanced Spot Removal In Adobe Photoshop Lightroom Classic
      • Unlock This Lesson
        Red Eye Removal In Adobe Photoshop Lightroom Classic

Your Account

Your Member Profile & Billing Info

© 2025 Focus Photo School · Rainmaker Platform