![]() Export in Adobe Photoshop Lightroom vernacular means “to save a new copy of your photograph for a specific purpose.” Think of Adobe Photoshop Lightroom Classic’s Export Dialog as if it were a big “Save As” button. Use this feature of Adobe Photoshop Lightroom Classic whenever you need to create a copy of your photo for distribution via email, print, or for use on the web.
Export in Adobe Photoshop Lightroom vernacular means “to save a new copy of your photograph for a specific purpose.” Think of Adobe Photoshop Lightroom Classic’s Export Dialog as if it were a big “Save As” button. Use this feature of Adobe Photoshop Lightroom Classic whenever you need to create a copy of your photo for distribution via email, print, or for use on the web.
Since the export process creates a new file, we must use clear terms to distinguish between the new copy and the original image. Let’s refer to the original image as the “source file” and refer to the new copy as the “exported file.” The source file is the image that you originally Imported into your Adobe Photoshop Lightroom Catalog.
Over time, you may have improved the source file by adding valuable metadata and you may have made visual improvements to this image using Photoshop Lightroom’s amazing Develop Module. Enhancing the source file might require a lot of work and it may even require the use of additional software like Adobe Photoshop CC. On export, all of your enhancements to the source file will be passed along to the exported copy.
Exporting in Adobe Photoshop Lightroom Classic is a one way street. None of the settings in the Export Dialog will alter the source file. The settings that you select in Adobe Photoshop Lightroom’s Export Dialog do not change the size, shape, or color of the source file in any way. This is a critical concept that often confuses new Photoshop Lightroom users.
I usually capture raw files when I am working with my camera. Bringing home raw files is usually the best use of my equipment, but these files are not ready for immediate distribution. Fortunately, working with digital camera raw files is painless and efficient using Adobe Photoshop Lightroom.
Once my raw file–the source file–is all tuned up, I can use Adobe Photoshop Lightroom Classic’s Export Dialog to create an email ready jpeg copy in no time. The settings that I choose within Photoshop Lightroom’s Export Dialog control the exported copy’s name, its file format, its size, and its metadata. In this case, my export settings tell the program to create a tiny little jpeg version that is optimized for email distribution, but the source file remains unchanged.
If the source file looks great inside of Lightroom Classic then the exported copy will also look great. This is an important detail. The current appearance of the source file is always passed down to the exported copy. If your source file currently appears as a black and white image within your Photoshop Lightroom Catalog, then the exported copy will be born as a black and white image. If you have given the source file dark vignetted corners using Adobe Photoshop Lightroom’s Develop Module tools then an exported copy will also have dark vignetted corners. What you currently see inside of your Photoshop Lightroom Catalog is what you will get in the exported copy.*
The exported copy can be stored in a different folder, or even on a different hard drive, than the original source file. You can choose whatever filename and destination you want for the exported copy within the Export Dialog without affecting the source file. The source file retains its current filename and stays in its current folder no matter how many times you invoke the Export Dialog.
Your exported copy can inherit all of the source file’s metadata or you can tell Photoshop Lightroom’s Export Dialog to strip out all but the most essential metadata fields. If enabled, the Minimize Embedded Metadata switch in the Export Dialog will remove everything but your copyright info from the exported copy’s metadata fields. Again, this Export Dialog choice will not affect the source file at all. Stripping metadata out of the exported copy reduces the file’s size and it can be useful when you want to keep your metadata private.
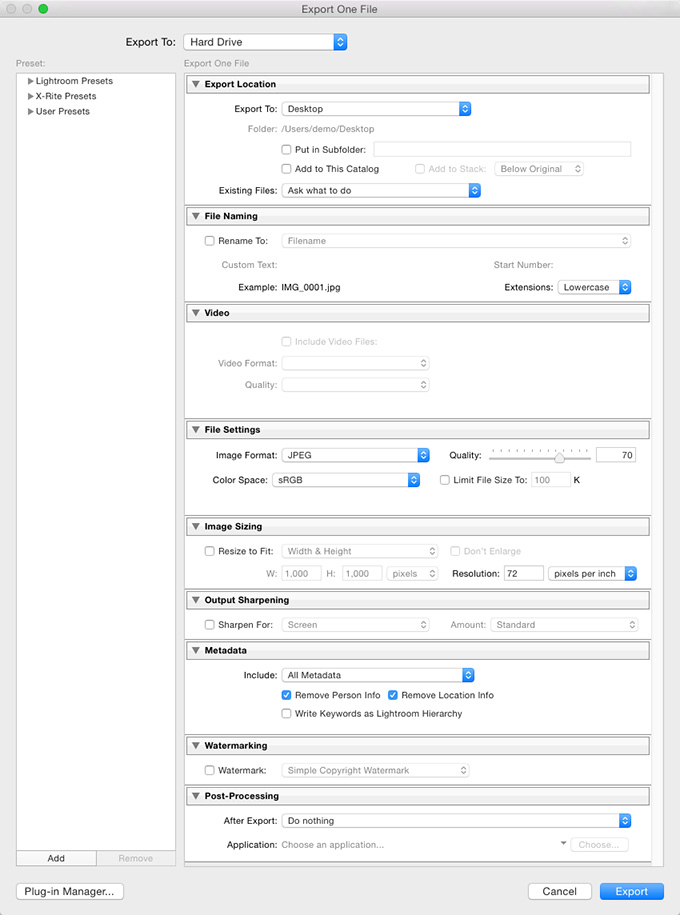
Most Photoshop Lightroom users eventually build an understanding of the basic controls inside of the Export Dialog, but there are two features that can confuse even experienced Photoshop Lightroom users. The ability to have the exported copy automatically added back into your Lightroom Catalog can be a tricky feature. Enabling the Add To This Catalog feature forces the Export Dialog to create an exported copy and then to create a reference point for the new image within your current Lightroom Catalog.
I usually leave this option turned off, but every now and then this “export then automatically import” routine makes sense. Automatically importing the exported copy can be useful, for example, when I need two separate versions of the same image within my Lightroom Classic Catalog. This trick, for example, can be useful when I want to create a full color image and a separate black and white version of the same original capture.
The Image Sizing controls are the other feature of the Export Dialog that often bewilder Photoshop Lightroom users. Your choices in the Image Sizing” portion of Export Dialog control the physical dimensions of the exported copy. If you are using Adobe Photoshop Lightroom’s Export Dialog to prepare files for printing at a professional photo lab then you should to use inches as the units of measure in this panel. On the other hand, pixels dimensions are the appropriate units of measure when working on a file that will be displayed on a web page. The correct resizing method, and the appropriate units of measure, change based on the purpose of the exported copy.
Learning to save Export Presets for repetitive tasks is one of the real secrets to Adobe Photoshop Lightroom happiness. Export Presets make life faster and easier by automating repetitive tasks. I don’t save a new Export Preset every single time that I use the Export Dialog, but if I find myself pushing the same buttons again and again, then I know it is time to create a new Export Preset. With the right Export Preset, I can click one button and let the program do everything else for me without altering my source file in any way!
—
*An exported copy always matches the current appearance of the source file within the Photoshop Lightroom Catalog however this can get a little confusing when exporting raw files. If you choose to export an image as a raw file, then the changes that you have made within Photoshop Lightroom may not be visible at your computer’s operating system level. The exported raw file does indeed have your Photoshop Lightroom improvements but your enhancements may not be visible using just your computer’s operating systems.